Showing posts with label happy birthday. Show all posts

Wednesday, April 10, 2013

Stampin' Up! Introduces Birthday Photopolymer Stamp Set!


Remember when I posted about our new completely clear stamping option called Photopolymer back on March 2nd?  If you don't then click Here to read that post.

Well another stamp set has been introduced and I wanted to share it with you!  It's a birthday stamp set that includes 7 clear stamps.  So here you go:


Here's why you are going to LOVE photopolymer stamp sets:

  • Top-quality photopolymer that gives a perfectly stamped image every time.
  • They’re entirely transparent for perfect placement!
  • Can you say sticky? (Don’t worry; in a good way.) These stamps stick amazingly well to our clear blocks.
  • They’re age tested. They won’t yellow or cloud up over time.
Take a look at the photopolymer stamps in action by watching the video below.


I am VERY excited for these stamp sets and what Stampin' Up! will come up with next!  Order yours at http://brittnysmith.stampinup.net then click Shop Now under the Products tab.

Thursday, October 18, 2012

Masculine Birthday Card


This card was inspired again by a card I saw on Pinterest.  You can see the original at Laura's Cards and More.  I needed a card I could make for my Grandfather's 95th birthday.  It's very hard to find masculine style cards and knew this would be perfect.
 
Supplies needed to make this card:
 
Card Stock: Crumb Cake base 5-1/2" x 4-1/4"
                    Very Vanilla 5-1/4" x 4"
                    Comfort Cafe DSP strips
 
Stamp Set: Bring on the Cake
Bring on the Cake - Clear-Mount Stamp - Clear-Mount Stamp Set - by Stampin' Up!
Ink: Cherry Cobbler
 
Accessories: Snail Adhesive
 
This card is so simple that you only need paper, ink and a stamp to create it!  This would be great for those just starting out making your own cards.


Friday, October 5, 2012

Birthday Card

 
Yesterday I posted the 30 sucks birthday gift I created for my friend.  Here's the card that I made to go with the gift.  This was designed using a card sketch from my local demonstrator group so all I had to do was figure out what supplies I was going to use.  I tried out a new technique that I learned from my upline at our local group meeting with the silver glimmer paperClick here to see how I changed the silver to midnight muse!

Supplies needed to make this card:

Card Stock: Midnight Muse base 4-1/4" x 5-1/2"
                    Patio Party DSP 4 layers 5-1/4" x 2", 2" x 1-3/4", 2" x 1" and 2" x 2"
                    Silver Glimmer paper scrap to punch
                    Whisper White scrap to punch

Stamp Set: Delightful Dozen (happy birthday stamp)
 
Ink: Midnight Muse marker and ink refill (refill used to color glimmer paper)
       Pool Party maker
       Summer Starfruit marker and classic ink pad to add color to white circle
       Raspberry Ripple marker
       Primrose Petals marker
 

Accessories: Basics Glimmer Brads
          Tools: Sponge Daubers
                     2-3/8" Scallop Circle Punch
                     2-1/2" Circle Punch
                     Paper Piercer and Mat
   Adhesives: Snail
                     Stampin' Dimensionals

Thursday, October 4, 2012

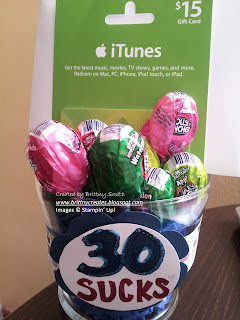
30 Sucks!

Front
I had a friend turning 30 a few weeks back and saw this idea on Pinterest that I knew I wanted to do.  You fill a container with lollipops and create the tag.  I used Patio Party DSP as the band around the container.  I ran Midnight Muse through the Big Shot with the Floral Frames Framelits Dies. I punched out a circle using the 2-1/2" Circle Punch.  I used the Marvelous Markers to freehand "30 Sucks."  Finally I added Dazling Details to add a little bling to the 30!  It was a big hit when I gave it to my friend.

Back

Tissue paper I stamped on for an added touch to the bag

The card to go with the gift that you can find details here.


Wednesday, October 3, 2012

Happy Birthday Card and Gift

 
I am an assistant high school volleyball coach.  The other person I coach with had a birthday on Saturday so I wanted to make her a little something.  I had baked cookies using the Special Events sweet pressed cookie stamp sets over the weekend and all I had to do was make a cute tag to close the bag with!  I put the cookies in our medium flat cello bags.  I created the tag by stamping the 3rd largest image from Daydream Medallions.
Daydream Medallions Clear-Mount Stamp Set
 I then stamped "a gift for you" from Bring on the Cake
Bring on the Cake - Clear-Mount Stamp - Clear-Mount Stamp Set - by Stampin' Up!
I used the coordinating die cuts from Floral Frames Framelits Dies to run the whisper white and DSP from Howlstooth and Scaringbone through the big shot.  I used snail adhesive to put the flowers together than tied the ribbon around the bag with white bakers twine.  This is a simple gift that doesn't take much time to make.

Of course I needed a card to go with the cookies though and here's what I came up with.
 
I saw this card on splitcoaststampers.com by Christine Kokiw and wanted to try it.  I just love how simple but neat this card looks.  This was a simple card to make that doesn't require a lot of supplies that could be adapted for other occasions.  I'm thinking of trying this out for thank you cards.
 
Supplies needed to make this card:
 
Card Stock: Tangerine Tango base 4-1/4" x 5-1/2"
                     Whisper White layer 4" x 5-1/4"
 
Stamp Set: Bring on the Cake (clear mount) 121958 $27.95 (wood mount) 121899 $38.95
 
Ink: Tangerine Tango
        Pacific Point
        So Saffron
        Old Olive
        Tempting Turquoise
 
Accessories: Old Olive 1/2" Scallop Dots Ribbon
          Tools: Big Shot
                     Houndstooth Textured Impressions Embossing Folder Die
                     Stamp-a-ma-jig (I don't usually use this tool but it worked perfect to line up "Happy Birthday")
                     Craft and Paper Scissors
   Adhesives: Snail
                     Mini Glue Dots to glue ribbon ends on back of whisper white


Thursday, July 19, 2012

Masculine Birthday Card

If you read my post yesterday you know that I created 2 birthday cards for a local meetup group I'm a part of who have allowed me to host a card making event on Friday.  Yesterday I showed you a feminine butterfly card and here is the masculine birthday card I created.


I always have a hard time with masculine cards.  You can't add all the glitter, bling and extras like you can on a card for a woman.  You have to keep it simple but was exactly what I wanted anyways for the meetup event.

I knew that I wanted to use this birthday stamp from Delightful Dozens.


I wanted to use this stamp as Subway art to showcase the different fonts and sayings in coordinating colors.  Subway art is very trendy right now.

Since I didn't have much inspiration I went to www.splitcoaststampers.com where you can search for examples by the stamp set name.  I saw this sample and knew it would be perfect for this card.  I changed the colors to match supplies I had and just love how it turned out.  I think I remember saying that yesterday too.  Maybe it's the simpleness to the last 2 cards that make me like them.  Usually I'm stressing about needing to add more, but knowing I wanted these cards simple makes me appreciate how a simple card can still look nice.

*I will post the supplies needed to make this card in another post.*

Wednesday, July 18, 2012

New Butterfly Card

One of my local meetup groups that I'm a member of has allowed me to put a card making event on the calendar.  I'm very excited of the possibility this might bring to my business!  My first event is this Friday and I went with a birthday theme because EVERYONE needs birthday cards.  We are making one feminine and one masculine card.  Here is the feminine card.


I'm keeping it very simple as I'm not sure how crafty anyone will be.  I want this to be a monthly event so I don't want to scare everyone away after the first event!  I was inspired by another demonstrator Deena Boos.  I adapted her card slightly with the supplies I had on hand and changed the color to Primrose Petals to showcase this new in-color.  Here's a side view to see how it's popped up and the primrose petal butterfly underneath the stamped butterfly makes it really stand out.


I just love this card and could really change the color and saying for many things.  What do you think?  I will let you know how the first meetup event goes next week.  Stop back tomorrow to see the masculine card.

*I will post the supplies needed to make this card in a future post.*

Friday, June 22, 2012

Ice Cream Card

I had my open house last weekend and created this card to go with the ice cream social for the make and take.  It's very simple and just think it's so cute.  I love the colors which are all new 2012-2014 in colors.  Can you name them?


I wanted to show how you can take a simple card like this and "step it up" as we Stampin' Up! demonstrators like to call it!  I changed/added four things on this card to "step it up."  Can you figure out what I changed from the simple card?


  • I used the new Finishing Touches Edgelits Die on the ends of the designer series paper and white card stock. (This counts as 1 and 2)
  • I embossed the midnight muse card stock using the new Argyle Textured Impressions Embossing Folder.
  • I added the cherry on top from the Cupcake Punch.
This didn't take much longer to do these extra steps but what a difference those little things make to your card.  So when you feel like your cards need something else to make it "pop," just think of "stepping up" what you already have on your card!

Wednesday, June 20, 2012

Cupcake Birthday Card

I made the following card for a girls 4th birthday.


I just absolutely love how this card turned out.  I've tried a new technique that I've seen all over the place but never tried it called faux quilting.  My upline Jeni Szmyd actually introduced it to me and I've been dying to try it out. (Click on her name to see her version of a card using this technique.)

This technique uses the Big Shot and the Square Lattice Textured Impressions Folder.  Cut out the shapes you want than adhere onto the card stock.  Finally run the card stock through the Big shot and folder and wah-lah, you've created a pretty cool looking quilting background.

I've added a few more circles to add a little more dimension to the card.  Love this technique and the possibilities are endless so I'm looking forward to using this on more of my cards.

The other new thing about this card is the green card stock and ribbon.  This is one of the new in-colors called Gumball Green.  Love this color and how cute is that new ribbon?  You can order that ribbon in all of the new 2012-2014 in colors.


Supplies needed to make this card:

Card Stock: Melon Mambo
                    So Saffron
                    Whisper White
                    Gumball Green

Stamp Set: Easy Events (I did not use the "happy birthday" saying under the cupcake)
Easy Events Stamp Set - by Stampin' Up!
Ink: Gumball Green Classic Ink Pad
        So Saffron Marker
        Melon Mambo Marker
        Gumball Green Marker

Accessories: Basic Rhinestones
                     Dazzling Details
                     Gumball Green 3/8" Stitched Satin Ribbon
         Tools: various sized Circle punches
                     1-3/4" Scallop Circle punch
                     Sizzix Big Shot
                     Square Lattice Textured Impressions Folder
         Adhesives: Snail
                            Mini Glue Dots
                            Stampin' Dimensionals

*Stay tuned for a video tutorial on how to make this card next week*

Thursday, May 24, 2012

Birthday Card


This has to be one of my favorite birthday cards I have made in a LONG time.  I just love everything about it.  I love the colors to this, the layout, the flowers, the texture, etc.  I got my inspiration from Mary aka Muffin's Mama on Splitcoast Stampers.  I changed and added things that would fit my style and supplies.  I actually don't want to give it away.  Ever have that problem?  My solution is to make 2 than I can keep one for myself!!

Here are the supplies needed to make this card:

Card Stock: Rose Red
                     Daffodil Delight Designer Series Paper Patterns Pack
                     Early Espresso
                     Whisper White

Ink: Early Espresso Ink Pad
        Rose Red Marker
        Daffodil Delight Marker

Stamp Set: Bring on the Cake

Accessories: Basic Rhinestones
                      Chocolate Chip 1/2" Scallop Polka Ribbon
                      3/16" Brads - Brights Collection (Daffodil Delight)
        Tools: Big Shot
                   Square Lattice Textured Impressions Embossing Folder Die
                   Boho Blossoms Punch
                   Paper Piercer
                   Mat Pack
         Adhesives: Snail
                            Stampin' Dimensionals

Sunday, May 2, 2010

Stamping 411 Sketch Challege 149

I have a bunch of birthday cards that I need to mail out for the month of May. So this weekend I worked on these so they are ready when I need to mail them. The stamping 411 sketch for this weeks challenge worked perfectly for my cards.

Here's the sketch and my card.


As a demonstrator we are allowed to preorder out of the new catalog a month before the catalog is released. I ordered the new happy birthday build a wheel stamps that fit into the jumbo handle out of the Summer Mini Catalog that began yesterday and runs until August 31. I didn't have anything that I needed to make to allow me a chance to use these stamps until now. I ordered the candles and words that say "happy birthday to you." I thought I was going to be able to use both but with the size strip that I used, you couldn't tell what the words were. So, I stuck with the candles in the background. I will be featuring the new build a wheel stamps in my upcoming workshop May 29th.

To make this card, I ran the pink paper through the Big Shot using the dot texture backgrounds #1 plate. The stamps are the birthday cake from Fun & Fast Notes and "make a wish" from A Little Birthday Cheer set. I used the markers to color the cake in. Remember: You can place an order on my site 24/7.

This turned out to be a very simple sketch to make a lot of the same cards.