This was a card I did at a previous workshop. Something simple but it was a WOW card! We used Cherry Cobbler and Wild Wasabi Stampin' Write Markers to color the stamp in the Just Believe set. I love doing this technique because you can personal the stamp how you want it to look. I stamped the happy birthday from the same set using Cherry Cobbler ink pad. We also used Versamark to stamp the circle image from the Just Believe set onto the Early Expresso cardstock. We tied a piece of Very Vanilla 1/4'' Grosgrain Ribbon around the White and Cherry Cobbler cardstock. This was a simple but great card to demonstrate at my workshop to show the ladies how versatile and easy our supplies are to make a card. I also wanted to demonstrate a card that they could use for any occasion. All they would have to is change the saying.
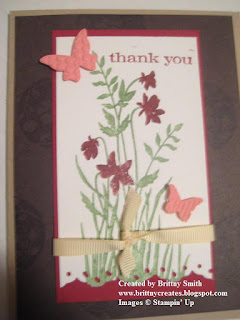
I wanted to make a thank you card for the secretary at my new job for all of the help she gave me when I first started. She was such a sweetheart introducing me to everyone and truly making me feel welcome to the building. I decided to take that workshop card and add to it. I used the same techniques from the above card. I than punched the Whisper White cardstock using the Eyelet Border punch and layered it over the Cherry Cobbler cardstock. I die cut Rose Red cardstock using the Beautiful Wings Embosslits Dies and the Sizzix Big Shot. I adhered the butterflies onto the card using Stampin' Dimensionals to add depth to the card. I stamped thank you from the Just Believe stamp set using the Cherry Cobbler ink pad. Here's the outcome.
I also stamped the envelope with the circle stamp from the Just Believe set with Cherry Cobbler ink. Added a little extra touch to the card that I loved. Here's a picture of the envelope with the card.
This would be a great card to demonstrate in a workshop or class to show simple to a more complicated card. I would also add heat embossing with the versamark circles as well as adding depth with the flowers by cutting out a second set to adhere on top of the flowers. I'm hoping to do this in my beginners and intermediate classes starting next year!


No comments:
Post a Comment