Monday, November 21, 2011

Online Extravaganza is Here!!!


Stampin' Up is kicking off the holiday shopping season with their online extravaganza!  There are some great deals that you won't want to miss out on.  If you were thinking of placing an order, now's the time to do it and include some items at discounted prices.  Perfect for those crafters in your family you need gifts for!

Check out a list of the items and their discounted prices HERE.

When you are ready to start shopping, head over to MY STORE to start saving now!  The prices will be discounted once you enter them into your basket.

There are 2 items discounted ONLY for the first 24 hours, so hurry and take advantage of these items.  The Simply Scored and the Simply Pressed Cookie Stamps won't last long at these prices!!  Happy online shopping!

Minnie Mouse

I have been wanting to recreate my cards that I made on My Digital Studio using my paper supplies.  I finally had the chance and have to admit that I'm LOVING this card.  I've never really been a huge Minnie Mouse fan, but since my son has gotten into The Mickey Mouse Clubhouse I've grown to love all the characters.  Well, one of my close friends out in San Diego (miss you so much Jodi) has 2 daughters and loves everything to do with Mickey Mouse.  Her daughters' birthdays are coming up in December and I wanted to make something that they as well as their mom would appreciate.  I just love how this card turned out.  I wish I could take credit for the creation but I cased it from inpirationink.com.  She created a Mickey Mouse card so I changed the colors to make it a Minnie Mouse!  I'm very pleased with the bow which truly makes it Minnie Mouse!


Close up of the card
This card used the color combo of Rose Red, Daffodil Delight and Early Expresso.  I punched out Minnie using the 1 3/4'' Circle Punch and 1 3/8'' Circle Punch for the two ears.

I did heat embossing for the first time on this card too.  I have always seen cards and wanted to try it but just never had the tools or guts to try it.  So I made myself try it and have fallen in love with embossing.  I want to emboss everything now!  What a neat thing to add to your cards.  So the polka dot background and her bow are embossed using Stampin' Up's Heat Tool and White Embossing Powder.  (If you want to learn how to heat emboss contact me for a class!)  The Happy Birthday is taken from the Bring on the Cake stamp set and was stamped using Early Expresso ink pad.  I used Daffodil Delight cardstock and folded at different spots and popped them up using Stampin' Dimensionals.  This technique makes the paper look more like ribbon since I didn't have daffodil delight ribbon on hand.  After embossing the cardstock, I used the 1 3/8'' Square Punch to make the triangles.  I connected the bow to the ear with a Rose Red mini brad.

Saturday, November 19, 2011

Being a Stampin' Up Demonstrator is Great!

I love being a Stampin' Up demonstrator.  There are so many great perks when you join.  Not only do you get 20% discount on every order you make, but you can also use the business as a tool to make a little extra cash if you wish.

What I absolutely love is our monthly demonstrator magazines that we receive.  There are SO many great ideas to help you grow your business and projects just to make as a crafter.  You cannot receive these unless you are a demonstrator.  I received this in the mail Friday and there is a flower box that I'm dying to make for some holiday gifts for family members.  I can access the supplies and directions needed to make this project on our demonstrator only website too.  So I have noted what I need and will be adding these supplies to my first demonstrator order in December.  Stay tuned for a future post once I have this project created.

The other thing that I just have to brag about being a Stampin' Up demonstrator is that we receive the catalogs at least a month in advance and then get to preorder the supplies from that catalog a month before it is released to customers.  That gives us the opportunity to create projects for workshops to increase sales for that catalog.  I just received my Occassions mini catalog that will begin in January and have to admit that I can't wait to preorder in December and start creating projects to share in January!  It will be hard not to share it before than but there are some great items you will just have to wait to see but it will be worth it!

Oh how I love the perks of being a Stampin' Up demonstrator!  Click on join me on the left to learn more and join my team!  I look forward to sharing my crafting love with you and having you apart of my growing business.

Friday, November 18, 2011

Happy Birthday!

I just wanted to dedicate this blog post to my husband (even though he never reads this blog!)  He is turning 28 today and I love it!  That just means he's getting one year closer to 30 when I can tease him like he's been teasing me for the last couple of months.  I love him to death and can't wait to spoil him tonight after work.  Here's the card I made for him that I slipped into his biology book so hopefully he sees it when he's in class to cheer him up just a little!  It's hard making cards for men sometimes when all you want to do is bling it out and make it fabulous like us girls!


Not sure why I can't flip this the right way through blogger because it's the right way on my computer.


Close up of the card

This card used color combo Night of Navy, Old Olive and Cajun Craze.  My husband is a HUGE Notre Dame fan so I tried to incorporate the green since that is his favorite color.  I used Builder Wheel Birthday and Candle Crazy using Old Olive ink pad.  The number stamp is from the Bring on the Cake stamp set using Old Olive ink pad.  I colored in the numbers 2 and 8 using my Cajun Craze Stampin' Write Marker.  I stamped the Birthday from the Bring on the Cake stamp set using my Craft White Ink pad.


Thursday, November 17, 2011

Online Extravaganza!

I have some exciting news from Stampin' Up!

Starting next week, Monday November 21, Stampin' Up will be having their annual online sale to kick of the holiday shopping season.  This sale will run through Wednesday, November 30th.

What do you need to do?  Log onto my website at brittnysmith.stampinup.net on Monday to take advantage of great savings, like FREE digital downloads valued at $40 when you buy My Digital Studio Express, 60 percent off select Designer Fabrics, and 30 percent off an exclusive ribbon bundle!


In addition, there will be two items on sale for 24 hours only (November 21, 12:01 AM - 11:59 PM [MT])-so make sure you don't miss the first 24 hours of Online Extravaganza!

Email me with your email so I can send you an e-card as a reminder to check out my store starting Monday, November 21st!

Tuesday, November 15, 2011

Thank You Card

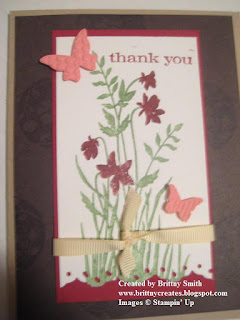
 This was a card I did at a previous workshop.  Something simple but it was a WOW card!  We used Cherry Cobbler and Wild Wasabi Stampin' Write Markers to color the stamp in the Just Believe set.  I love doing this technique because you can personal the stamp how you want it to look.  I stamped the happy birthday from the same set using Cherry Cobbler ink pad.  We also used Versamark to stamp the circle image from the Just Believe set onto the Early Expresso cardstock.  We tied a piece of Very Vanilla 1/4'' Grosgrain Ribbon around the White and Cherry Cobbler cardstock.  This was a simple but great card to demonstrate at my workshop to show the ladies how versatile and easy our supplies are to make a card.  I also wanted to demonstrate a card that they could use for any occasion.  All they would have to is change the saying.

I wanted to make a thank you card for the secretary at my new job for all of the help she gave me when I first started.  She was such a sweetheart introducing me to everyone and truly making me feel welcome to the building.  I decided to take that workshop card and add to it.  I used the same techniques from the above card.  I than punched the Whisper White cardstock using the Eyelet Border punch and layered it over the Cherry Cobbler cardstock.  I die cut Rose Red cardstock using the Beautiful Wings Embosslits Dies and the Sizzix Big Shot.  I adhered the butterflies onto the card using Stampin' Dimensionals to add depth to the card.  I stamped thank you from the Just Believe stamp set using the Cherry Cobbler ink pad.  Here's the outcome.


I also stamped the envelope with the circle stamp from the Just Believe set with Cherry Cobbler ink.  Added a little extra touch to the card that I loved.  Here's a picture of the envelope with the card.


This would be a great card to demonstrate in a workshop or class to show simple to a more complicated card.  I would also add heat embossing with the versamark circles as well as adding depth with the flowers by cutting out a second set to adhere on top of the flowers.  I'm hoping to do this in my beginners and intermediate classes starting next year!


Monday, November 14, 2011

My Digital Studio Cards

My sons birthday is coming up on Dec 2nd.  He has become obsessed with Mickey Mouse which isn't a bad thing in my opinion! ;)  So we are having a Mickey Mouse themed birthday party.  I wanted to create invitations around his theme.  I am going to create them using my paper supplies but I wanted to see what they looked like using My Digital Studio from Stampin' Up.  I figured doing it this way would make the process a lot easier because I would have already figured out the style of the card.  I also cased it from here.  It was so simple to create using My Digital Studio (MDS) is why I just absolutely love our software.  So here's the card.


Front 


Inside

I also wanted to try to make a Minnie Mouse version of this same card.  Again, it was so simple to create it with MDS.  Even though I'm not a pink person, I absolutely love this card.  I'm looking forward to making the cards that will be posted in a future post, so stay tuned!


Wednesday, November 9, 2011

First Card

I have been dying to make my first card using my starter kit since I received it last week.  Unfortunately with two small kids and Halloween, I didn't have time.  I finally took some time last night to make a birthday card for my sister-in-law.  Talk about waiting until the last minute since her birthday is Friday and it needs to be mailed to Bellingham, WA!  It was probably a good thing though because it got my butt in gear to do some crafting!

I have to admit that I am in love with this card.  I just love how it turned out and I pretty much made it from scratch.  I know there are probably thousands of cards out there that look very similar to mine but I just played around with my supplies to get it to look like this.  The reason I chose this design was because of the saying.  The cupcake and saying are from the Create a Cupcake set.  The saying says, "It's not about how many candles you blow out but how many cupcakes you get!"  Because of that I knew I wanted as many cupcakes that I could get on my card.  So with my design I could fit 3.


I chose the color combination of Tangerine Tango, Tempting Turquoise, and Old Olive from the Brights collection. I think the colors just look fabulous together and they pop really well on this card. I ran the tangerine tango cardstock through my Big Shot using the Square Lattice textured impressions embossing folders. I stamped the cupcakes with all three colors to mix and match. I punched out the cupcakes using the Cupcake Builder punch. I tied the Old Olive ribbon around the card front. I used Tempting Turquoise designer series paper to mount the cupcakes on and popped the middle cupcake up with Stampin' Dimensionals.  Here's a close up of the cupcakes.

The best thing about this card is that it was made only using supplies from my starter kit.  I was a demonstrator about a year ago and had to stop due to financial hardship with having a second child and husband getting out of the military.  Unfortunately, I wasn't able to make it work.  Needless to say, I have a bunch of other Stampin' Up supplies.  But I wanted to show that you can make gorgeous cards by only using what's given to you when you Join My Team!  It's a great time to join but only until Friday because you can receive a FREE Big Shot or $100 in FREE merchandise.  Check out that promotion here.

I will keep this card in my arsenal of designs to use again because I love it so much, plus it's very easy to recreate.  The next time I will use embossing powder on the icing of the cupcake to make that pop a little more!  Just a suggestion if anyone tries this card.


Shop with Me!

I just had to write a big THANK YOU to my upline Jen for providing me with the adorable shopping cart badge on my right hand side.  I have seen this on a few blogs and searched and searched for it, but could never find it.  She happened to have it and was kind enough to send me the link for my blog.  She also got it from a very kind person's blog Debbi's Designs.  Not sure what her blog link is but do a search since she's the creator.  I also want to send you to my upline's blog since she's the best!  Check her work out at Stamp with Jeni.  Being a demonstrator is the best because we all have each other's backs and are willing to help each other's business grow!  I love Stampin' Up!!

Monday, November 7, 2011

FREE Downloads

I hope everyone got their FREE downloads from My Digital Studio for National Digital Srapbooking Day!  I just downloaded mine and look forward to creating some projects with them.  Please share any pictures or blog posts for your creations with the new FREE downloads.

Sunday, November 6, 2011

Blog Header

Check out my new header and let me know what you think.  It was created solely using My Digital Studio from Stampin' Up.  I love this software!

Blog Signature

I have been using my Sunday to learn how to edit my blog a little more.  I have been meaning to personalize my blog more and more.  I ordered My Digital Studio and realized how much I can do with this software.  I have been very happy I added it to my starter kit.  It's great!!  The first thing to note about my new blog is my signature at the end of each post from now on.  I hope you like it.  It was created all through My Digital Studio.  Leave a comment to let me know what you think.  Stay tuned for my new blog header to come shortly (at least I hope!)

Thursday, November 3, 2011

Monthly Projects

I updated my sidebar with the monthly projects and promotions for November.  When you click on the projects you will be taken to the site to see the supplies needed to make the project.  The promotions will take you directly to my demonstrator site.  Just wanted everyone to know.  Happy crafting!

Tuesday, November 1, 2011

Starter Kit

I received my starter kit yesterday!  Unfortunately with it being Halloween and having 2 small boys to go trick-or-treating with, I did not have time to do anything with it but take the supplies out of the box.  I cannot wait to make my first project using my starter kit.  I took a picture of everything and will post a little later.  Stay tuned for my first project with my supplies!

Boom, Boom Ain't It Great to Be a Hostess!! Boom, Boom

This promotion made me think of that song.  A great time to host a workshop through me!  Check out the following flyer to see the benefits of hosting a workshop now until Dec. 15th!  Contact me immediately to set up your date.


Dates: November 1-December 15, 2011
Details
Hostesses will receive an additional $35 in free Stampin' Up! products when you hold a workshop totaling $350 or more (excluding tax and shipping)! This is in addition to all the other benefits you already get as a Stampin' Up! hostess.

Things to Remember
•Only customer, hostess, and workshop order types qualify for this promotion. Online orders do not qualify. Contact me if you'd like me to submit the order for you.
•Orders must be $350 or more to qualify.
•Orders larger than $350 are not eligible for additional hostess free merchandise dollars. For example, a $700 workshop does not receive $70 in additional dollars. All orders over $350 always receive $35 in additional free hostess dollars.
•Hostesses may use their additional $35 in free merchandise on any catalog/mini catalog products.